Manager
Handle the project structure by adding or modifying stages, their components and reviewing notes.
Overview
Basic view of the Project Manager. It is split into two sides, both of which will be explained in detail.

At the top left side are located three Viewport selection buttons:
- Manager
- Synchronize
- Inspector
- Documents
These are three main viewports of the project, each used for different tasks and features that will be described in the following pages.
Left manager section

Left side of the manager view is static and always displays the stages of the project.
Filter
Use various methods to search for the specific notes throughout stages in the project.
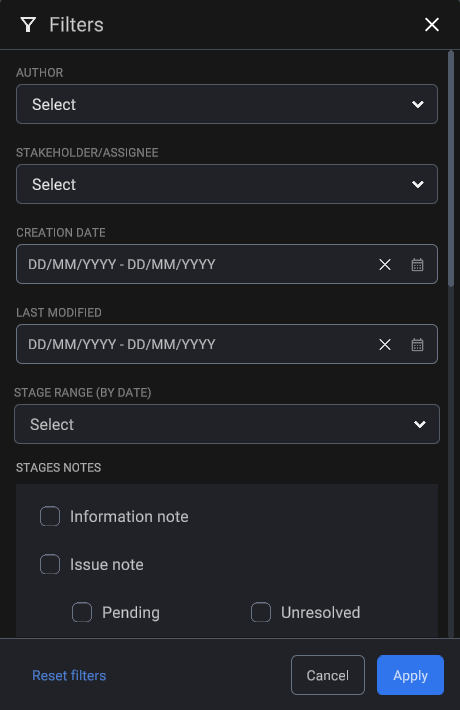
Our search engine lets you set multiple filters, as well as specific ones for different Annotation types.
Stage
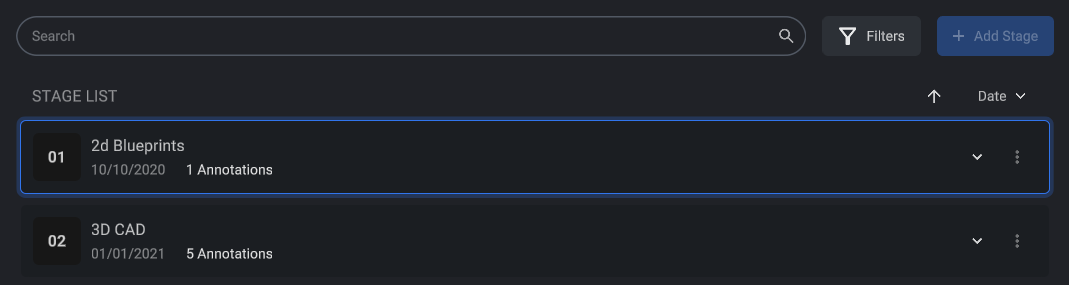
A stage in the app refers to a 3D virtual environment that represents different phases of a project. Each stage is composed of various components and elements that can be dynamically adjusted or switched to display distinct views or states of the project. Stages are then set to specific points in time, allowing users to navigate through the project’s development or evolution seamlessly.
To create a stage, click the ![]() button.
button.
To add a Stage you must have necessary permissions. See Roles page to learn more about access within projects
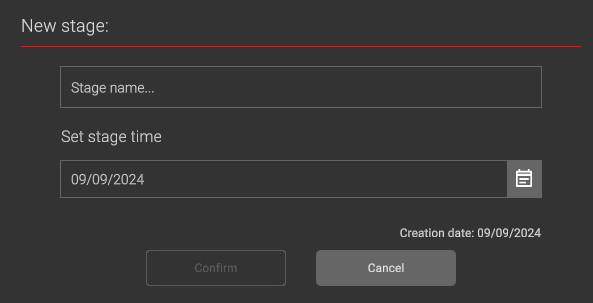
A new window will appear where you will be asked to set the Stage name and stage time. Upon confirming, an empty Stage will be created and automatically placed in the Stage List based on the Stage time that was set.
Set the Stage Time to the date corresponding to the state of the building made at the time
The Stage Time date is also used to determine the Stage order in the application. For example in the Timeline
To edit or delete the stage, click the ![]() more options button located at the end of the stage line of the corresponding stage.
more options button located at the end of the stage line of the corresponding stage.
Annotations
Pressing the  expand list button of the stage, will reveal the list of annotations, created for that stage.
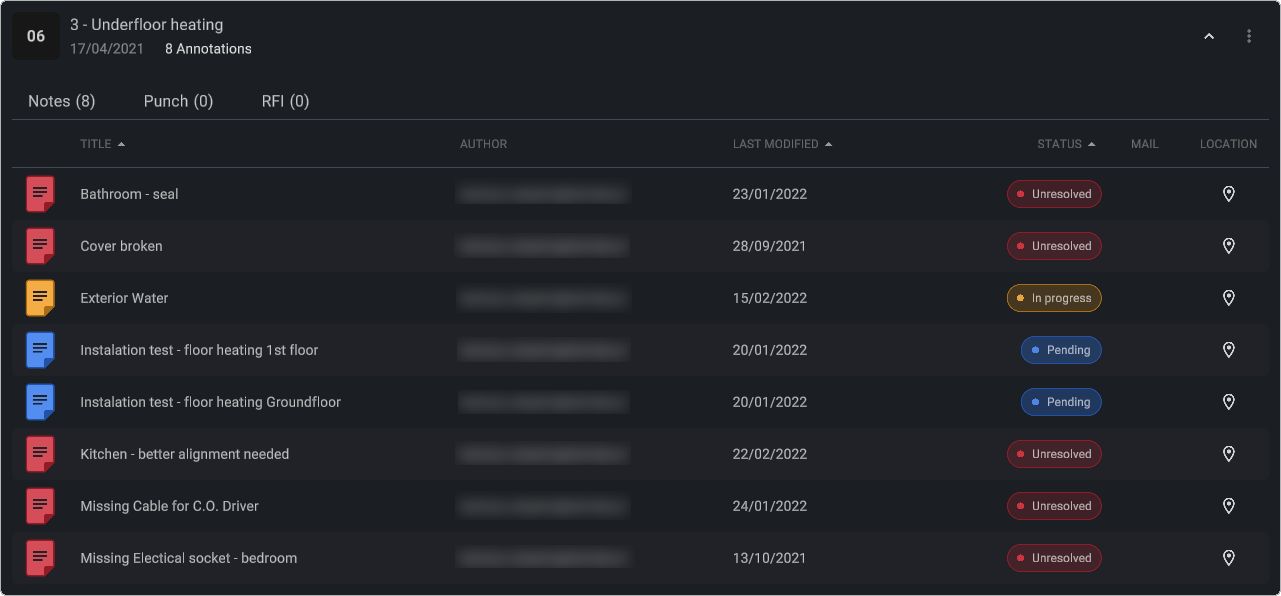 Expanded Stage Annotations list
Some Annotation types are from third party management software and require you to connect to that software provider in order for them to be visible (Punch and RFI tabs being an example of Procore Integration)
Right manager section
Right side of the manager view is dynamic, it changes depending on what is selected on the Stage panel (be it a note, or a stage.)
Stage view
If the stage was selected (clicked) the right side of the viewport will change it's view to show the stage details.
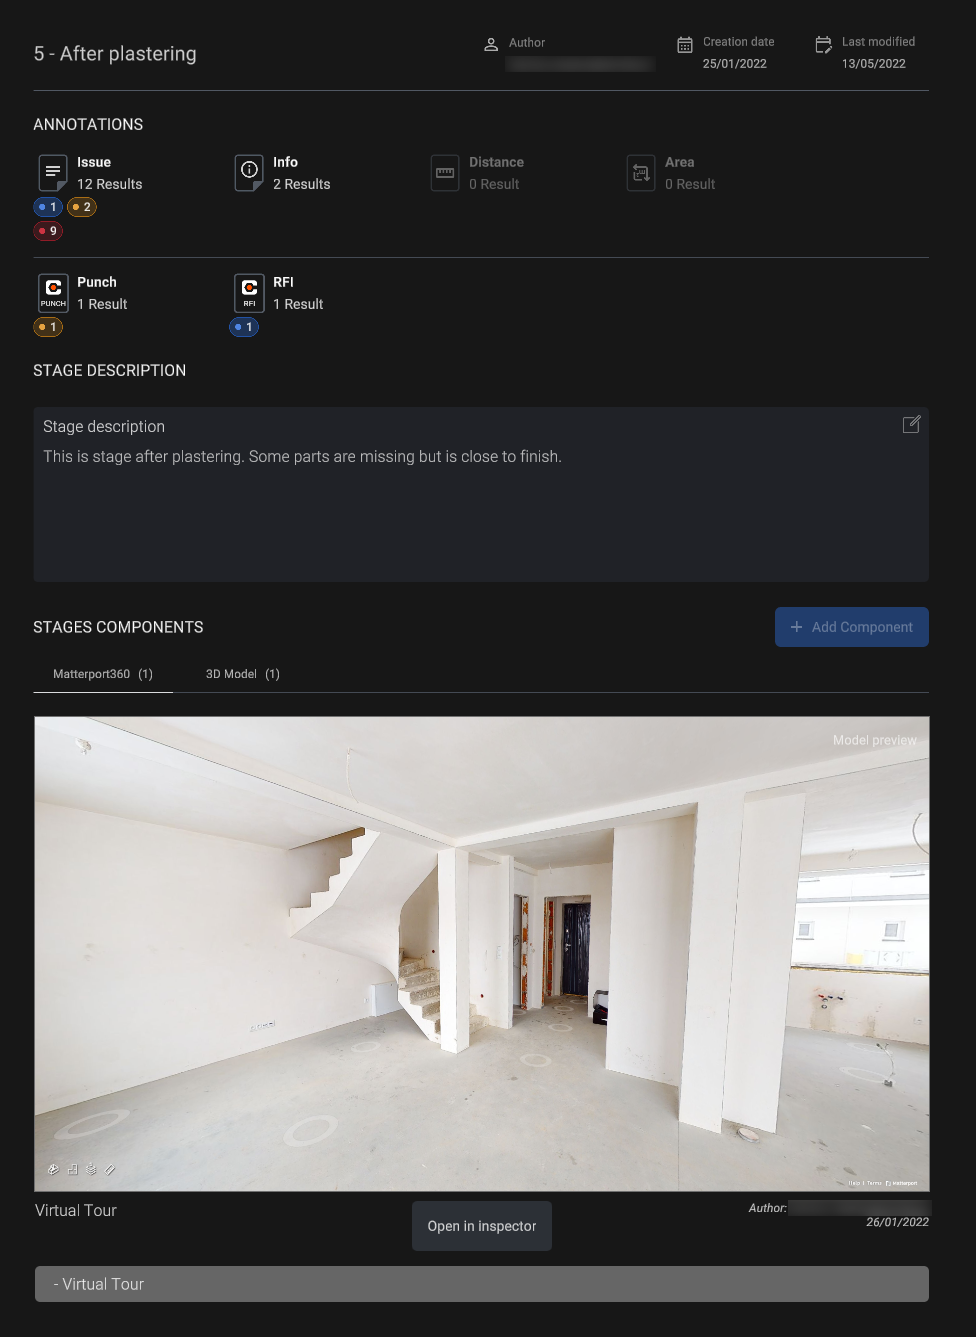
First are stage Annotations, sorted by their type and their responding number.
Under them is the stage description. To change it, click the ![]() edit icon located in the right top corner of the text field. To exit, left mouse click anywhere outside the text edit window.
edit icon located in the right top corner of the text field. To exit, left mouse click anywhere outside the text edit window.
There's a 2000 character limit for the stage description.
Components
The component section has two parts: a component preview and a component list.
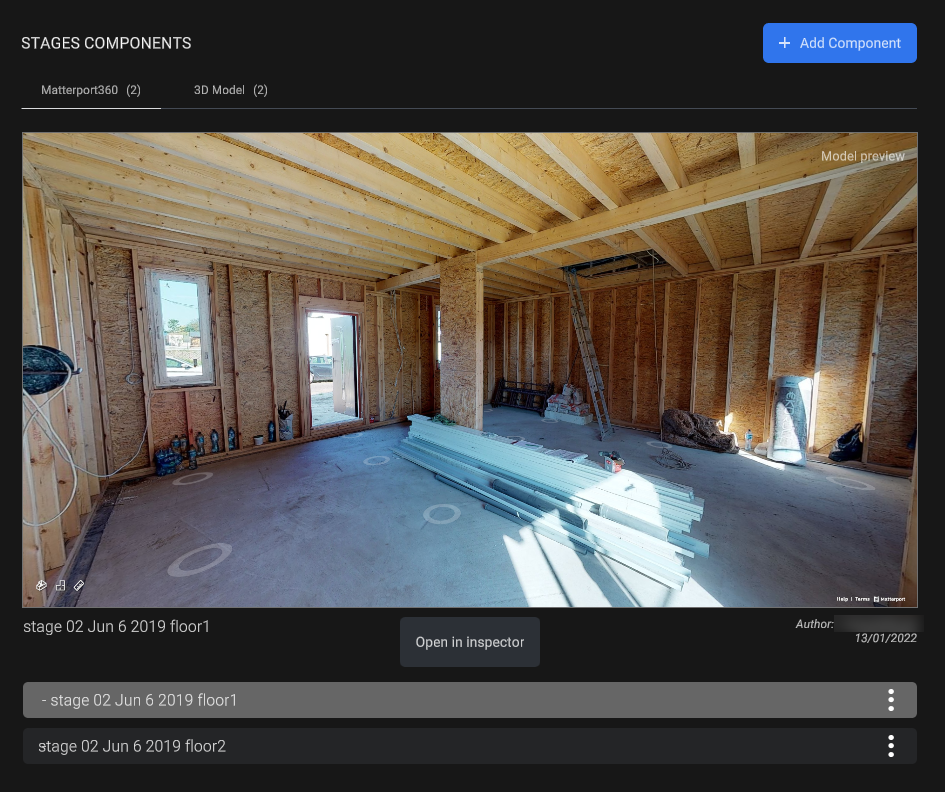
Components are grouped by file families, under tabs located in the top left part of the component section. To add a new component to the stage, click the Blue + Add Component button that will open a new window where you will be able to pick the file and it's name for the component.
Under the preview is located the component list. By selecting a component from the list, it will be first loaded then displayed in the preview window. To rename or delete a component, click the ![]() more options button of the corresponding component in the list.
more options button of the corresponding component in the list.
You can manipulate the component preview the same as in any virtual 3D space. Rotate, move and zoom as seen necessary
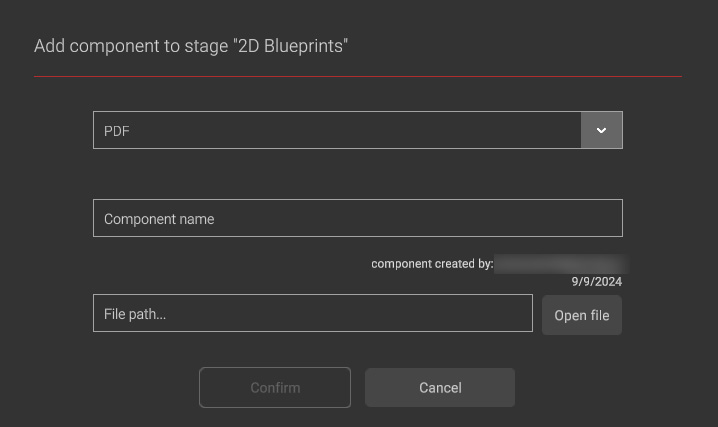
Choose the component filetype from the roll-out window you want to add, set it's name in the text field below and navigate to the file path of the asset you wish to import.
In case of adding a Matterport Virtual Tour component, you will be asked to provide either a public or private link
To add a private link, you are required to be logged in to your Matterport account
Supported component filetypes
| 3D geometry file formats |
|
| BIM object file formats |
|
| 2D digital image file formats |
|
| Document file formats |
|
| Pointcloud file formats |
|
|
Make sure the files you want to add are located on the local drive of your desktop
You can either paste a direct file path in the text field, or navigate to it manually clicking "Open file"
To add components to stages you must have necessary permissions in the project. |
See Documents Page to learn about File Browser within STAGES.
Note View
Clicking the note from the annotations list in the Stage panel switches to note view, showing all the details of the selected note.
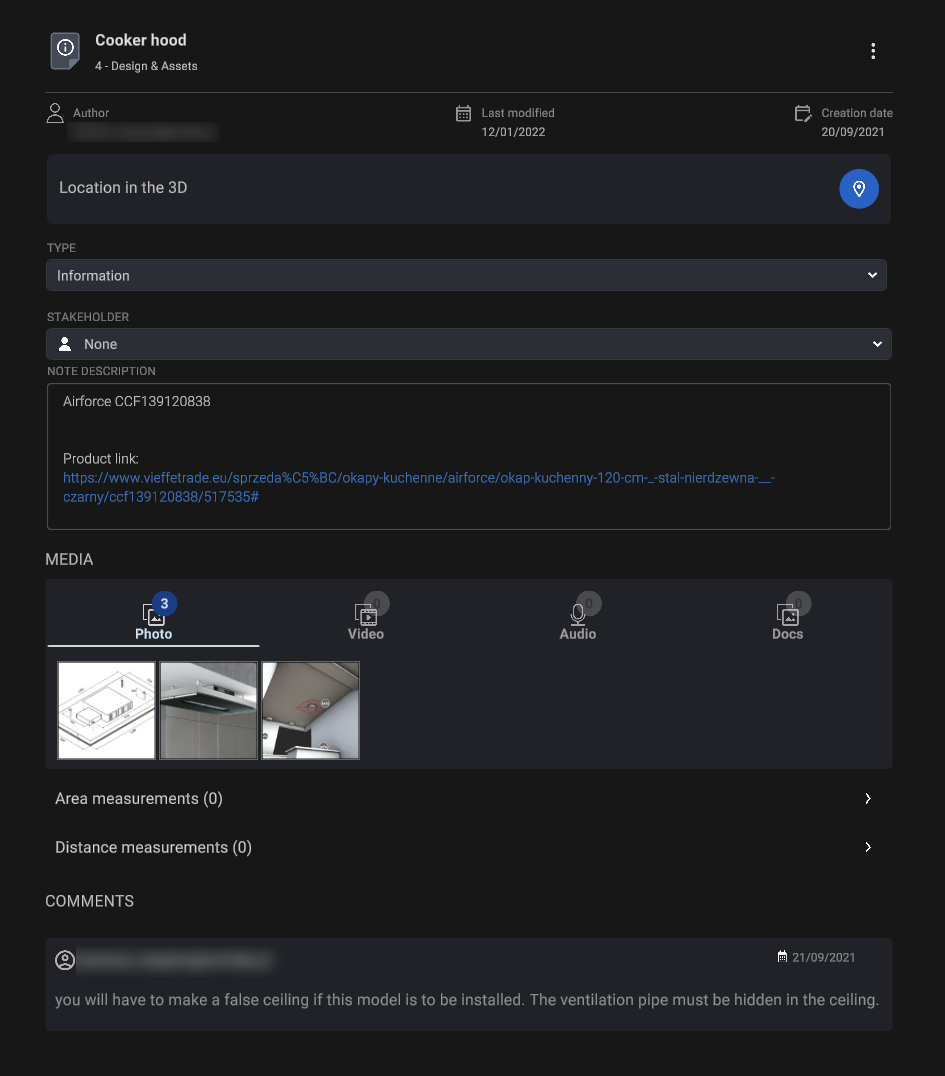
Here you can manage every aspect of the note, set it's status, add media files and communicate with other project members.
Clicking the ![]() more options button reveals additional actions:
more options button reveals additional actions:
- Rename
- Note Transfer (between stages)
- Toggle e-mail notification
- Delete
Media
The next note section, after the general note information is dedicated for the external files that might be added to the note. Files here are grouped into four families, as seen on the image above:
|
|
|
|
You can see the file previews just under the group icons. To inspect a file - left click on the desired preview tile, a larger window with the file will open. Depending on a file type, you will be provided with additional functions, for example: An image file can be drawn on.
Underneath that are two lists of measurements attached to the note. Here you can quickly see how many (if any) there are.
Comments
The last part of the note view is designated for user communication. It allows you to further comment on the issue the note is addressing and reply to other users.
You can view the notes at any time. To create or edit a note you are required to possess appropriate permissions
See Roles page to learn more about permissions