Projects
Centralized Project Management.

Projects List
The first thing you'll see in the Projects panel is the project list. The list lets you quickly navigate through the projects assigned to the organization. Projects are displayed in rows containing the most basic information, as seen on the snapshot above. You can also create
a new project from this panel by clicking the ![]() button. This action will open a project creation window.
button. This action will open a project creation window.
The entire Project Creation process, together with Project Features are thoroughly explained in the Project Chapter
 To access further Project settings, click the more options
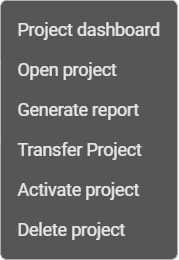
 ![]() button of the desired project, located at the end of each project's row. Window containing various project actions and shortcuts to Project Panel will appear. Now we will go through each of them in order:
button of the desired project, located at the end of each project's row. Window containing various project actions and shortcuts to Project Panel will appear. Now we will go through each of them in order:
- Project dashboard - Lets you individually manage various aspects of the project.
It is separated into the three categories:
Members section lets you manage Users assigned to the project, individually. Here you can remove and add project members and change their privileges in spite of their organization role and/or the teams they are a part of. More options ![]() button in this section lets you perform three actions: View the user's Dashboard, Set user's privileges in project and Remove user from project.
button in this section lets you perform three actions: View the user's Dashboard, Set user's privileges in project and Remove user from project. 
Teams section's main function, aside from listing the teams together with their most basic information in the current project, is being the only place where you can add and/or remove the teams from project. By clicking more options ![]() you can additionally go to the Team's Settings Panel.
you can additionally go to the Team's Settings Panel. 
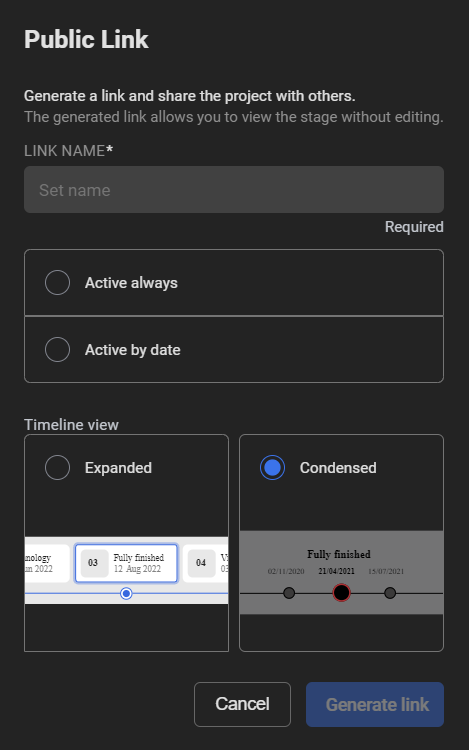
Public Links section lets you generate and manage a View only links for the project.

To create a new link click ![]() and proceed with the options shown in the new window. To complete this process, you need to set the Link's name (used only for the organizational purposes) and choose whether it should have an expiration date or be active indefinitely (you can change it later on). Finally you need to decide on the style of the Timeline view.
and proceed with the options shown in the new window. To complete this process, you need to set the Link's name (used only for the organizational purposes) and choose whether it should have an expiration date or be active indefinitely (you can change it later on). Finally you need to decide on the style of the Timeline view.
Timeline view style of the link cannot be changed afterwards
Every link is displayed in it's own row that consists of: the link's name, the current status of the link, how many visits there were with that particular link and it's expiration date.
Use the Copy link button to quickly share the link with other people.
By opening more options ![]() you can edit the link's expiration date. Moreover, there's also an option to revoke it completely. You will be shown a warning before proceeding with this action.
you can edit the link's expiration date. Moreover, there's also an option to revoke it completely. You will be shown a warning before proceeding with this action.
- Open Project - Shortcut to the currently selected Project Panel.
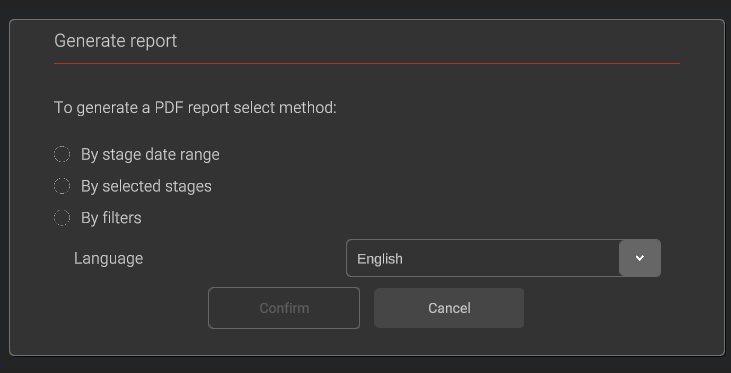
 Generate report - Opens up a new window where you can select the Project Stages you want to generate a report from. The report will be generated as a PDF file. It will contain information such as: stage names, note names, creation dates, users and comments.
To generate a report, first you must choose between three available methods of report generation. Each of them has their own types of information filters. Use the one that suits your needs the best. Lastly you can change the Report language (currently only English and Japanese are available).
The report will be automatically downloaded upon the confirmation.
- Transfer project - Transfer the project to a different organization, using the Receiving Organization ID. The project will be moved to another organization and you will no longer be able to manage it and will not be visible on your project list.
To transfer the project, it first needs to be Archived, to lock its editing
- Activate / Archive project - Depending on the current status of the project, this action will either Archive it (make it non-editable) or Activate it (make it editable).
You can only have as many Active Projects as your current Subscription Plan allows you to
- Delete project - Opens up a window, warning you that after this action the project will be unrecoverable. In order to proceed with the project deletion you are required to confirm the action by typing the project name in the provided Text Field.
